

The perfect egg
How to boil a 63 degree egg all the time, without any fancy tools.
This write-up is not intending to cover the physical properties of how RFID technology works. Rather, it is aimed at explaining how data is stored, accessed and written on RFID tags. There’s already a wealth of information available online explaining what RFID is, how it works, and the different types of RFID. A good starting point is the Wikipedia page on RFID.
For my project, I chose the most affordable type of RFID tags (and reader), which operate in the 13.56MHz band, making it one of the most common types.
If you’re considering using RFID technology for your project, there are several important factors to keep in mind before making any purchases:
Compatibility: If you already have RFID tags but lack a reader, ensure that the RFID reader you purchase can read the frequency of your tags. For instance, the RC522 can only read 13.56MHz, which is the type of band common for NFC and HID cards.
Supplier Reputation: Purchase your reader from a reputable supplier, especially if you’re considering the RC522. There are numerous faulty or underperforming readers on the market. I was fortunate to have purchased two units, with one functioning optimally. Consider purchasing units from different suppliers.
Technical Knowledge: If you aim to change the unique ID of the tag with RC522, it’s more complex than merely writing/reading data into the memory blocks of the card. Having C++ knowledge can be beneficial to understand and modify the existing libraries as needed. Invalid read/write operations or attempts to write on certain blocks of the tag can result in a soft brick.
Equipment: Most RC522 boards don’t come with the pins soldered, so you’ll likely need soldering equipment, a breadboard, and jumper wires. A list of resources can be found at the end of this write-up.
A classic MIFARE 1K (1024 bytes) card is typically one of the most common types of RFID tags in the 13.56MHz band. There are also MIFARE 4K cards which hold 4096 bytes and share the same basic architecture.
The memory of the card is divided into 16 sectors, each containing four blocks. Each block can hold up to 16 bytes of data. This means that the MIFARE 1K has 64 blocks in total (0 to 63), with each block holding 16 bytes, resulting in a total of 1024 bytes.
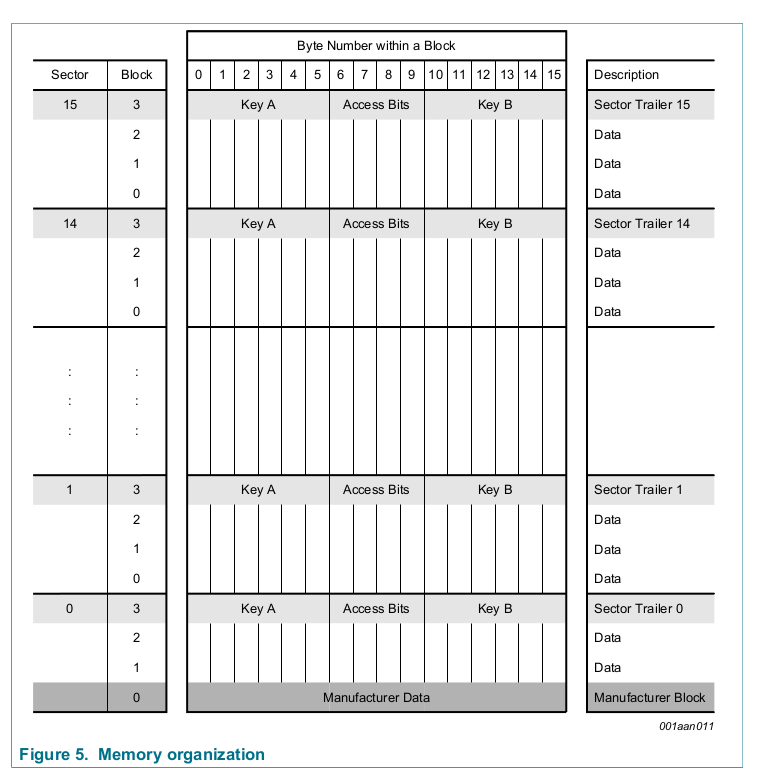
The first block (block 0 out of 63) contains the manufacturer’s identification number and the application identifier.![[Pasted image 20230915070925.png]]
The last block of every sector, known as the trailer block, contains information such as the sector number, the number of blocks in the sector, and the checksum, which is used to verify the integrity of the data in the sector. Writing to a trailer block can cause the entire sector to become corrupted.
Each trailer contains secret keys A (mandatory) and B (optional), which return logical “0”s when read, and the access conditions for the blocks of that sector, stored in bytes. The access bits also specify the type (data or value) of the data blocks.

All sectors (remember there are 16 sectors in total in a MIFARE 1k) contain 3 blocks of 16 bytes for storing data (Sector 0 contains only two data blocks and the supposedly read-only manufacturer block).
The data blocks can be configured as • read/write blocks • value blocks
Value blocks are essentially a “template” for a write operation. It is just a specific write operation on a block. The special characteristic of value blocks is that they allow a fixed set of commands, which are read, write, increment, decrement, restore, transfer). For example, you could define a value block that gets incremented every time the tag is scanned.

The four adr bytes signify a 1-byte address which can be used to save the storage address of a block, when implementing backup management. The address byte is stored four times, twice inverted and non-inverted.
Once you’ve grasped these concepts, you can explore the various Python or C++ libraries available. I’ve listed some useful resources below for the two most common platforms for the RC522. Overall there seems to be a lot more support in the arduino libraries vs the RPi libraries, but as I already had a couple spare RPis, I was happy to use the existing C and Python libraries and make any modifications as required. :)
RaspberryPi:
Arduino:
P.S. Make sure to read the datasheet for the RFID tag you are using. :)
How to boil a 63 degree egg all the time, without any fancy tools.
Have you wondered why DSPs & TPUs>GPUs>CPUs for ML workloads? Now you can find out!